Deploy to EC2
To share a demo or an evaluation with your team, run quinectl on one EC2 instance behind an Application
Load Balancer. The load balancer handles HTTPS with a real certificate, and publicUrl tells quinectl the
addresses browsers use.
A shared demo, not production
This is still one machine running a development Keycloak, with a Grafana that signs in as
admin / admin. Keep real data off it, and limit who can reach it. For production, see
Kubernetes with Helm and
Terraform on AWS.
How it fits together
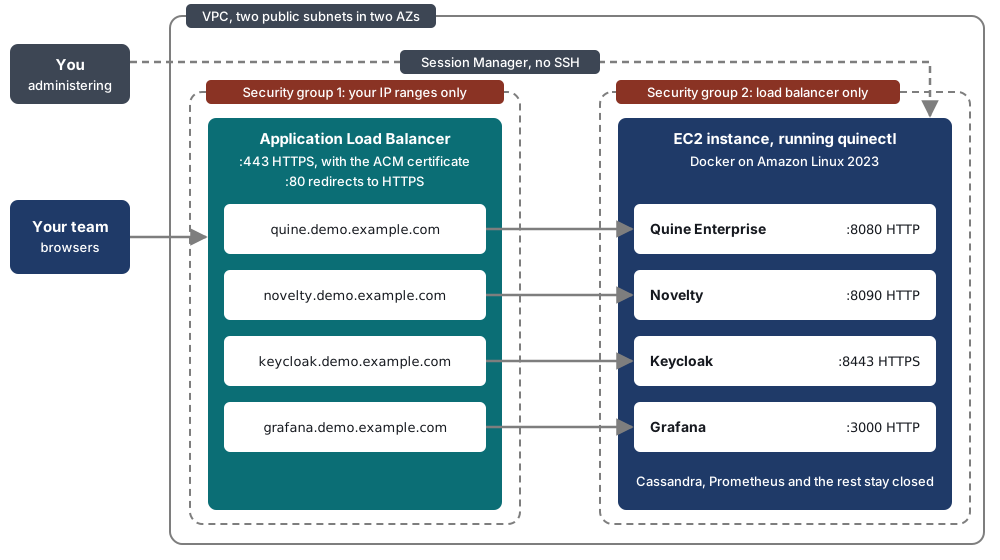
The load balancer ends HTTPS and routes each hostname to a port on the instance. These examples use
demo.example.com; use a domain of your own.
| Hostname | Instance port | Protocol to the instance | Health check |
|---|---|---|---|
quine.demo.example.com |
8080 |
HTTP | GET /api/v2/system/readiness returns 204 |
novelty.demo.example.com |
8090 |
HTTP | GET /api/v2/system/readiness returns 204 |
keycloak.demo.example.com |
8443 |
HTTPS | GET /realms/master returns 200 |
grafana.demo.example.com |
3000 |
HTTP | GET /api/health returns 200 |
Keycloak serves a certificate from quinectl's local certificate authority, which the load balancer doesn't verify.
1. Create the AWS resources
Create these in order, because each one uses the ones before it.
- Network: a VPC with an internet gateway, and two public subnets in different Availability Zones. A load balancer needs at least two.
-
Security groups: create two, one for the load balancer and one for the instance.
Security group Inbound Outbound Load balancer 80and443, from your own IP ranges onlyLeave the default Instance 8080,8090,8443and3000, from the load balancer's group onlyLeave the default Keep the instance's other ports closed, because quinectl also publishes Cassandra, Prometheus and any Kafka broker there. The instance needs its outbound access to pull images, reach the license server and connect to Session Manager. If you limit the load balancer's outbound rules, still allow it to reach the instance's group on these ports, for traffic and health checks.
-
Instance: Amazon Linux 2023 on x86-64, in a public subnet with a public IP address and the instance security group. Give it an instance role with the
AmazonSSMManagedInstanceCorepolicy, so you can connect with AWS Systems Manager Session Manager. You don't need SSH or a key pair.An
m6i.2xlargewith a 100 GBgp3root volume is enough for this guide. It has been tested with more: a cluster of three members and one hot spare, plus Novelty, Keycloak, Kafka and metrics. -
Certificate: one AWS Certificate Manager certificate covering the four hostnames, in the same Region as the load balancer. Use DNS validation, and add the CNAME records it gives you. Route 53 can add them for you. Validation times out after 72 hours.
- Target groups: one for each row of the table above, with that row's port, protocol and health check, and the instance as its target. Targets stay unhealthy until you start quinectl.
- Load balancer: an internet-facing Application Load Balancer in both subnets, with the load balancer
security group and a 300 second idle timeout. Give it two listeners:
- HTTPS on
443: use the certificate, add one rule per hostname that forwards to its target group, and set a fixed404as the default action. - HTTP on
80: redirect to HTTPS.
- HTTPS on
- DNS: an alias record for each hostname, pointing at the load balancer.
2. Prepare the instance
Open a session on the instance, then install Docker:
sudo dnf install -y docker
sudo systemctl enable --now docker
sudo usermod -aG docker ec2-user
Switch to ec2-user, which picks up the group change, and run the remaining steps as that user:
sudo su - ec2-user
Install quinectl with the linux-amd64 build; see Get quinectl.
3. Write the configuration
Create a directory for the project, and put this quinectl.yaml in it, with your own hostnames:
quine:
  edition: enterprise
  publicUrl: https://quine.demo.example.com
  licenseKey: ${QE_LICENSE_KEY}
  customerId: ${QE_CUSTOMER_ID}
  users:
    - username: demo-admin
      password: ${DEMO_PASSWORD}
      roles: [SuperAdmin]
novelty:
  port: 8090
  publicUrl: https://novelty.demo.example.com
  licenseKey: ${NOVELTY_LICENSE_KEY}
  customerId: ${NOVELTY_CUSTOMER_ID}
  users:
    - username: demo-admin
      password: ${DEMO_PASSWORD}
      roles: [SuperAdmin]
services:
  persistor: cassandra
  auth:
    keycloak:
      publicUrl: https://keycloak.demo.example.com
      secureCookies: true
  proxy: none
  metrics:
    prometheusGrafana:
      grafanaPublicUrl: https://grafana.demo.example.com
      grafanaAnonymous: false
  kafka: none
publicUrlis the address browsers use. quinectl gives it to the product and to Keycloak, while its own checks andquinectl tokenstay onlocalhost.usersreplaces the sample users, whose passwords are published in these docs. They can no longer sign in.secureCookies: truekeeps session cookies on HTTPS.proxy: noneis needed because the load balancer is the front door.grafanaAnonymous: falsemakes Grafana ask for a sign-in.
Quine Enterprise and Novelty need different hostnames, because they share a session cookie name; see Two products, two addresses.
4. Start it
Set the keys and the demo password, then run up:
export QE_LICENSE_KEY=<your Quine Enterprise key>
export QE_CUSTOMER_ID=<your customer id>
export NOVELTY_LICENSE_KEY=<your Novelty key>
export NOVELTY_CUSTOMER_ID=<your customer id>
export DEMO_PASSWORD=<a password of your own>
quinectl up
up reports the public addresses:
✓ metrics converged: grafana https://grafana.demo.example.com/d/quinectl-quine-f8dec21d90ab (admin/admin) — prometheus http://localhost:9090, scraping 2/2 members
  https://grafana.demo.example.com/d/quinectl-novelty-f8dec21d90ab
✓ quine is up: https://quine.demo.example.com
✓ novelty is up: https://novelty.demo.example.com
If up warns that a host doesn't resolve, check the DNS records. It carries on either way.
5. Check it
Once the target groups are healthy, this prints 204:
curl -s -o /dev/null -w '%{http_code}\n' https://quine.demo.example.com/api/v2/system/readiness
Open https://quine.demo.example.com and sign in as demo-admin. Novelty's address works the same way.
For REST API calls, run quinectl token on the instance, then call the public address with the token:
curl -s -X POST https://quine.demo.example.com/api/v2/graph/quine/cypher:query \
  -H 'Content-Type: application/json' \
  -H "Authorization: Bearer $(quinectl token)" \
  -d '{"text":"RETURN 1"}'
The response looks like this:
{"columns":["1"],"results":[[1]]}
Run a cluster
To run a cluster, add cluster: under quine:, and put every member's port in the
Quine Enterprise target group, such as 8080 to 8083 for three members and one hot spare. Open the
same ports in the instance's security group, and turn on cookie stickiness for the target group.
A hot spare answers readiness with 503, so its target shows as unhealthy and gets no traffic. That is
expected.
Before you share it
- Grafana: it signs in as
admin/admin, and that can't be changed: after a new password, everyquinectl upfails withunexpected status 401. The IP limit on the load balancer is what protects it. To keep Grafana private, leave out its hostname, target group and security group rule. - Keycloak: its admin console is reachable through the load balancer, so the same limit protects it.
- Secrets: the exported keys and password live in your session. A secret store such as AWS Systems Manager Parameter Store keeps them out of your shell history.
Change an address
Edit the publicUrl and run quinectl up. The product restarts on its new address, and Keycloak accepts
it. Add the matching DNS record, certificate name and listener rule on the AWS side.
Stop it
quinectl down stops the products, and leaves Cassandra, Keycloak and your graph in place. To remove
everything, see Stopping and removing. Delete the AWS
resources when you're done, because the instance and load balancer cost money while they exist.
Next steps
- For production, see Kubernetes with Helm or Terraform on AWS.
- To run more members on the instance, see Run a Local Cluster.