Quickstart
thatDot Novelty streams categorical data and instantly highlights anomalies with explanations. This short guide will show you how to start Novelty, stream Categorical Data into it, and analyze the observation results that are streamed out.
Before You Begin
Novelty requires a valid license key. To obtain a license, contact thatDot sales at sales@thatdot.com or request an evaluation. You'll receive your license key, download link, and setup instructions. The summary of it is this:
- Obtain your license key from thatDot sales
- Download Novelty from the provided link
- Configure and run Novelty
Starting the Novelty instance should show that the Novelty web server is ready to serve requests at localhost:8080

It may also help to read Novelty's Core Concepts before starting.
Sample Data Download for Quickstart
You can download some sample data to ingest into Novelty here. The download is a zip file, vast-m1-behaviors-csv.zip. Unzip it and use vast-m1-behaviors.csv, which contains data from the VAST Insider Threat Challenge. Here is a sample line from the file:
prox-in-building,37.170.100.38,80,37.170.100.200
This record represents the following Categorical data:
Prox Building Status, Source IP, Port, and Destination IP
We will use this file in this Quickstart.
How to Stream Data Into Novelty
There are 2 ways to stream Categorical Data into Novelty:
- The Upload UI: Great for uploading a batch of data from a file
- The REST API: Great for production, ingesting data from any supported input stream
Stream Data using the Upload UI
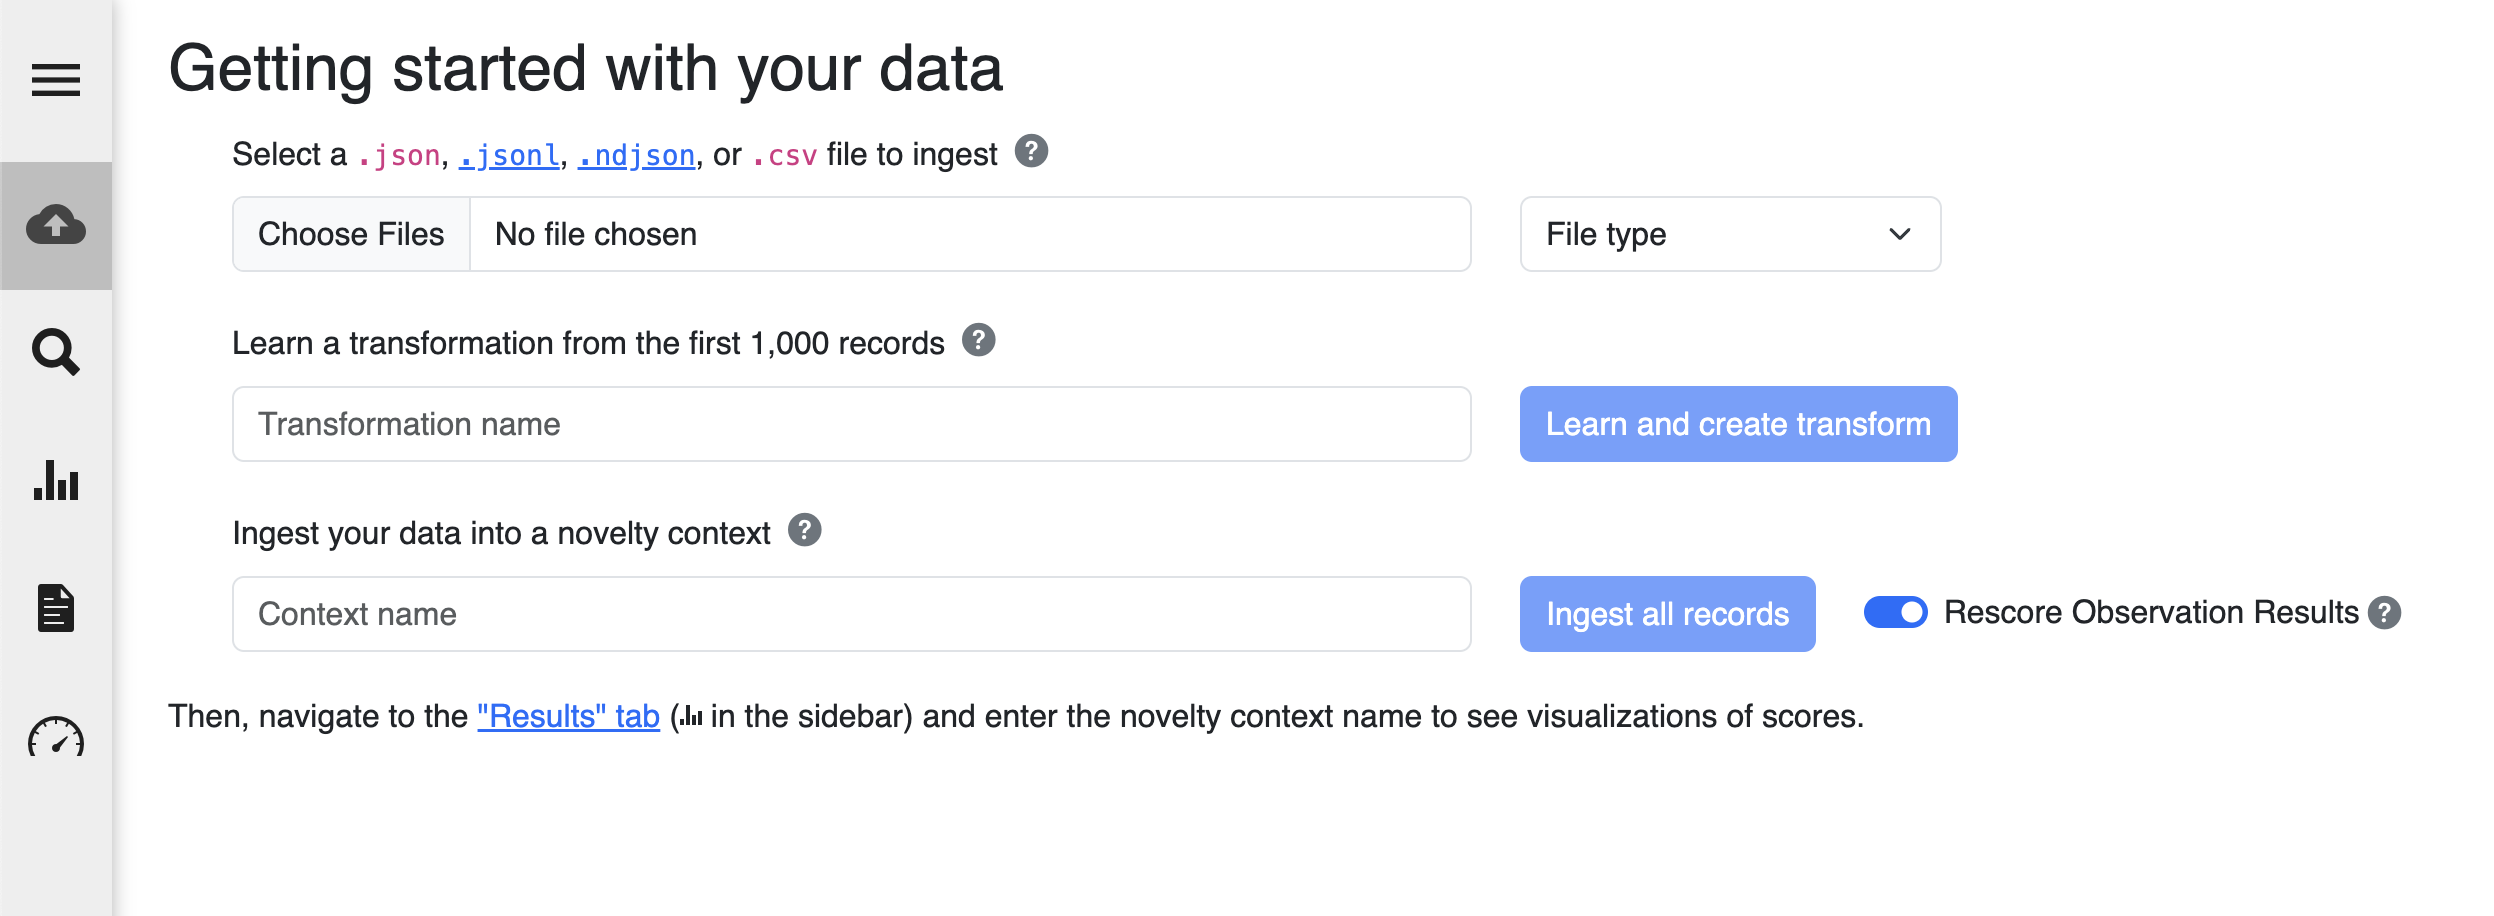
The Upload UI finds novel data in 3 steps:
- Upload a File
- Create a Transformation
- Stream Observations into Novelty
Upload a File
A file of various different formats can be ingested:
- CSV
- TSV
- JSON
- JSONL
- NDJSON
- Plain Text
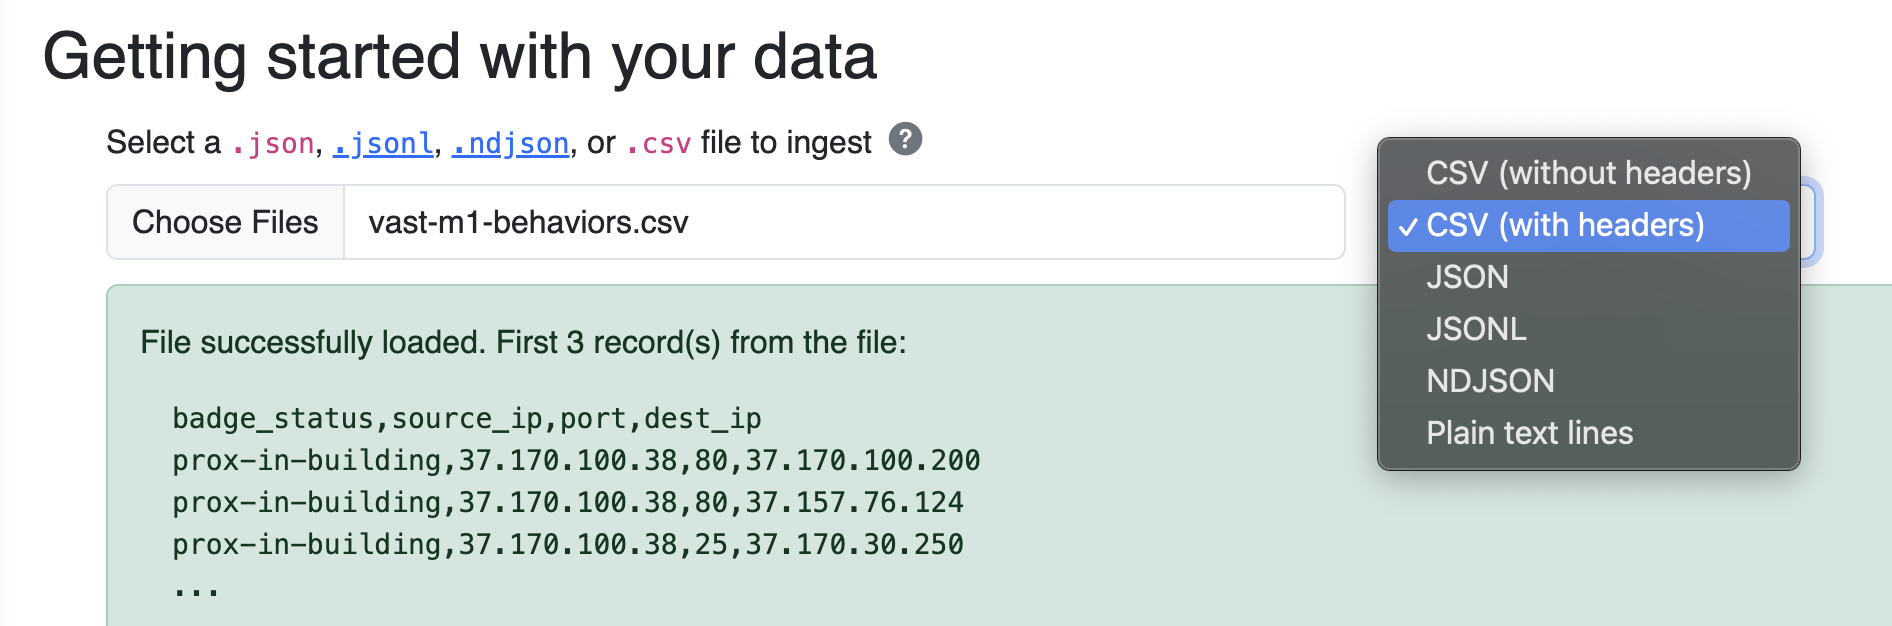
Click the Choose Files button and select the downloaded vast-m1-behaviors.csv file. Since this CSV file has headers, make sure to select the CSV (with headers) file type to ensure Novelty doesn't create Observation Results from the header record.
Creating a Transformation
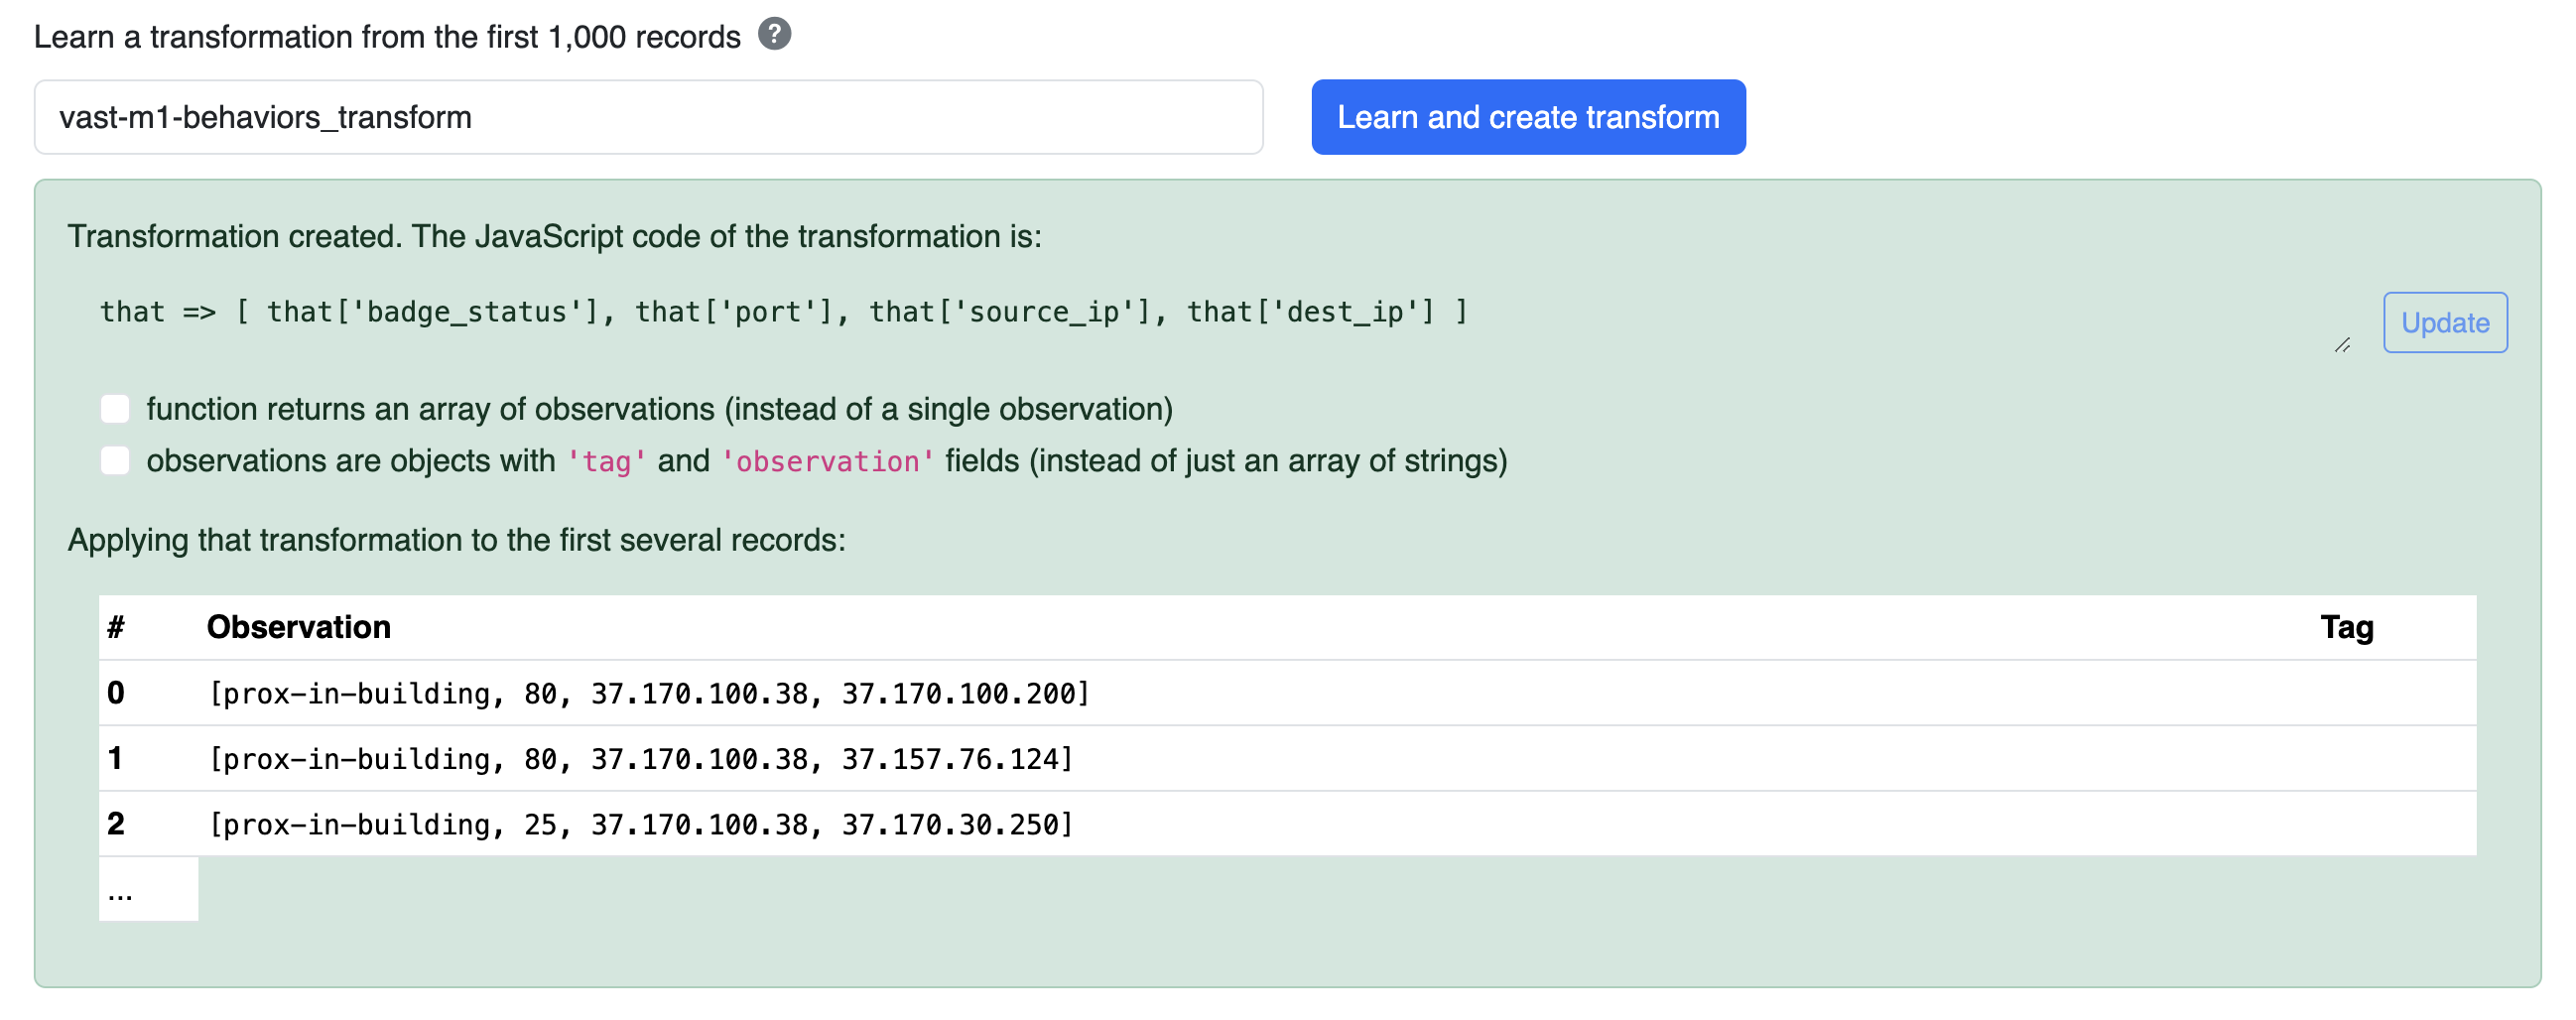
After choosing a file and selecting its File Type, the Learn and create transform button will be enabled. Click it to have Novelty attempt to automatically create a transformation. Novelty names the transformation after the file, so for this file the name box shows vast-m1-behaviors_transform.
Note
- Transformation: A transformation is a JavaScript function that is responsible for converting each record in the chosen file into an Observation.
- Observation: An element that is streamed into Novelty. It is a list of Observation Components.
- Observation Component: A string containing a piece of Categorical Data.
For this VAST Insider Threat dataset, the following transformation is automatically created:
that => [ that['badge_status'], that['port'], that['source_ip'], that['dest_ip'] ]
Each record is represented by the that variable. This JavaScript function accepts a that parameter and returns an Observation, which is an Array of Observation Components. The transformation can be editted, and this is your opportunity to change the order of Observation Components, or to convert/bin Numerical Data into Catagorical Data.
(Optional) Adding a tag to every observation
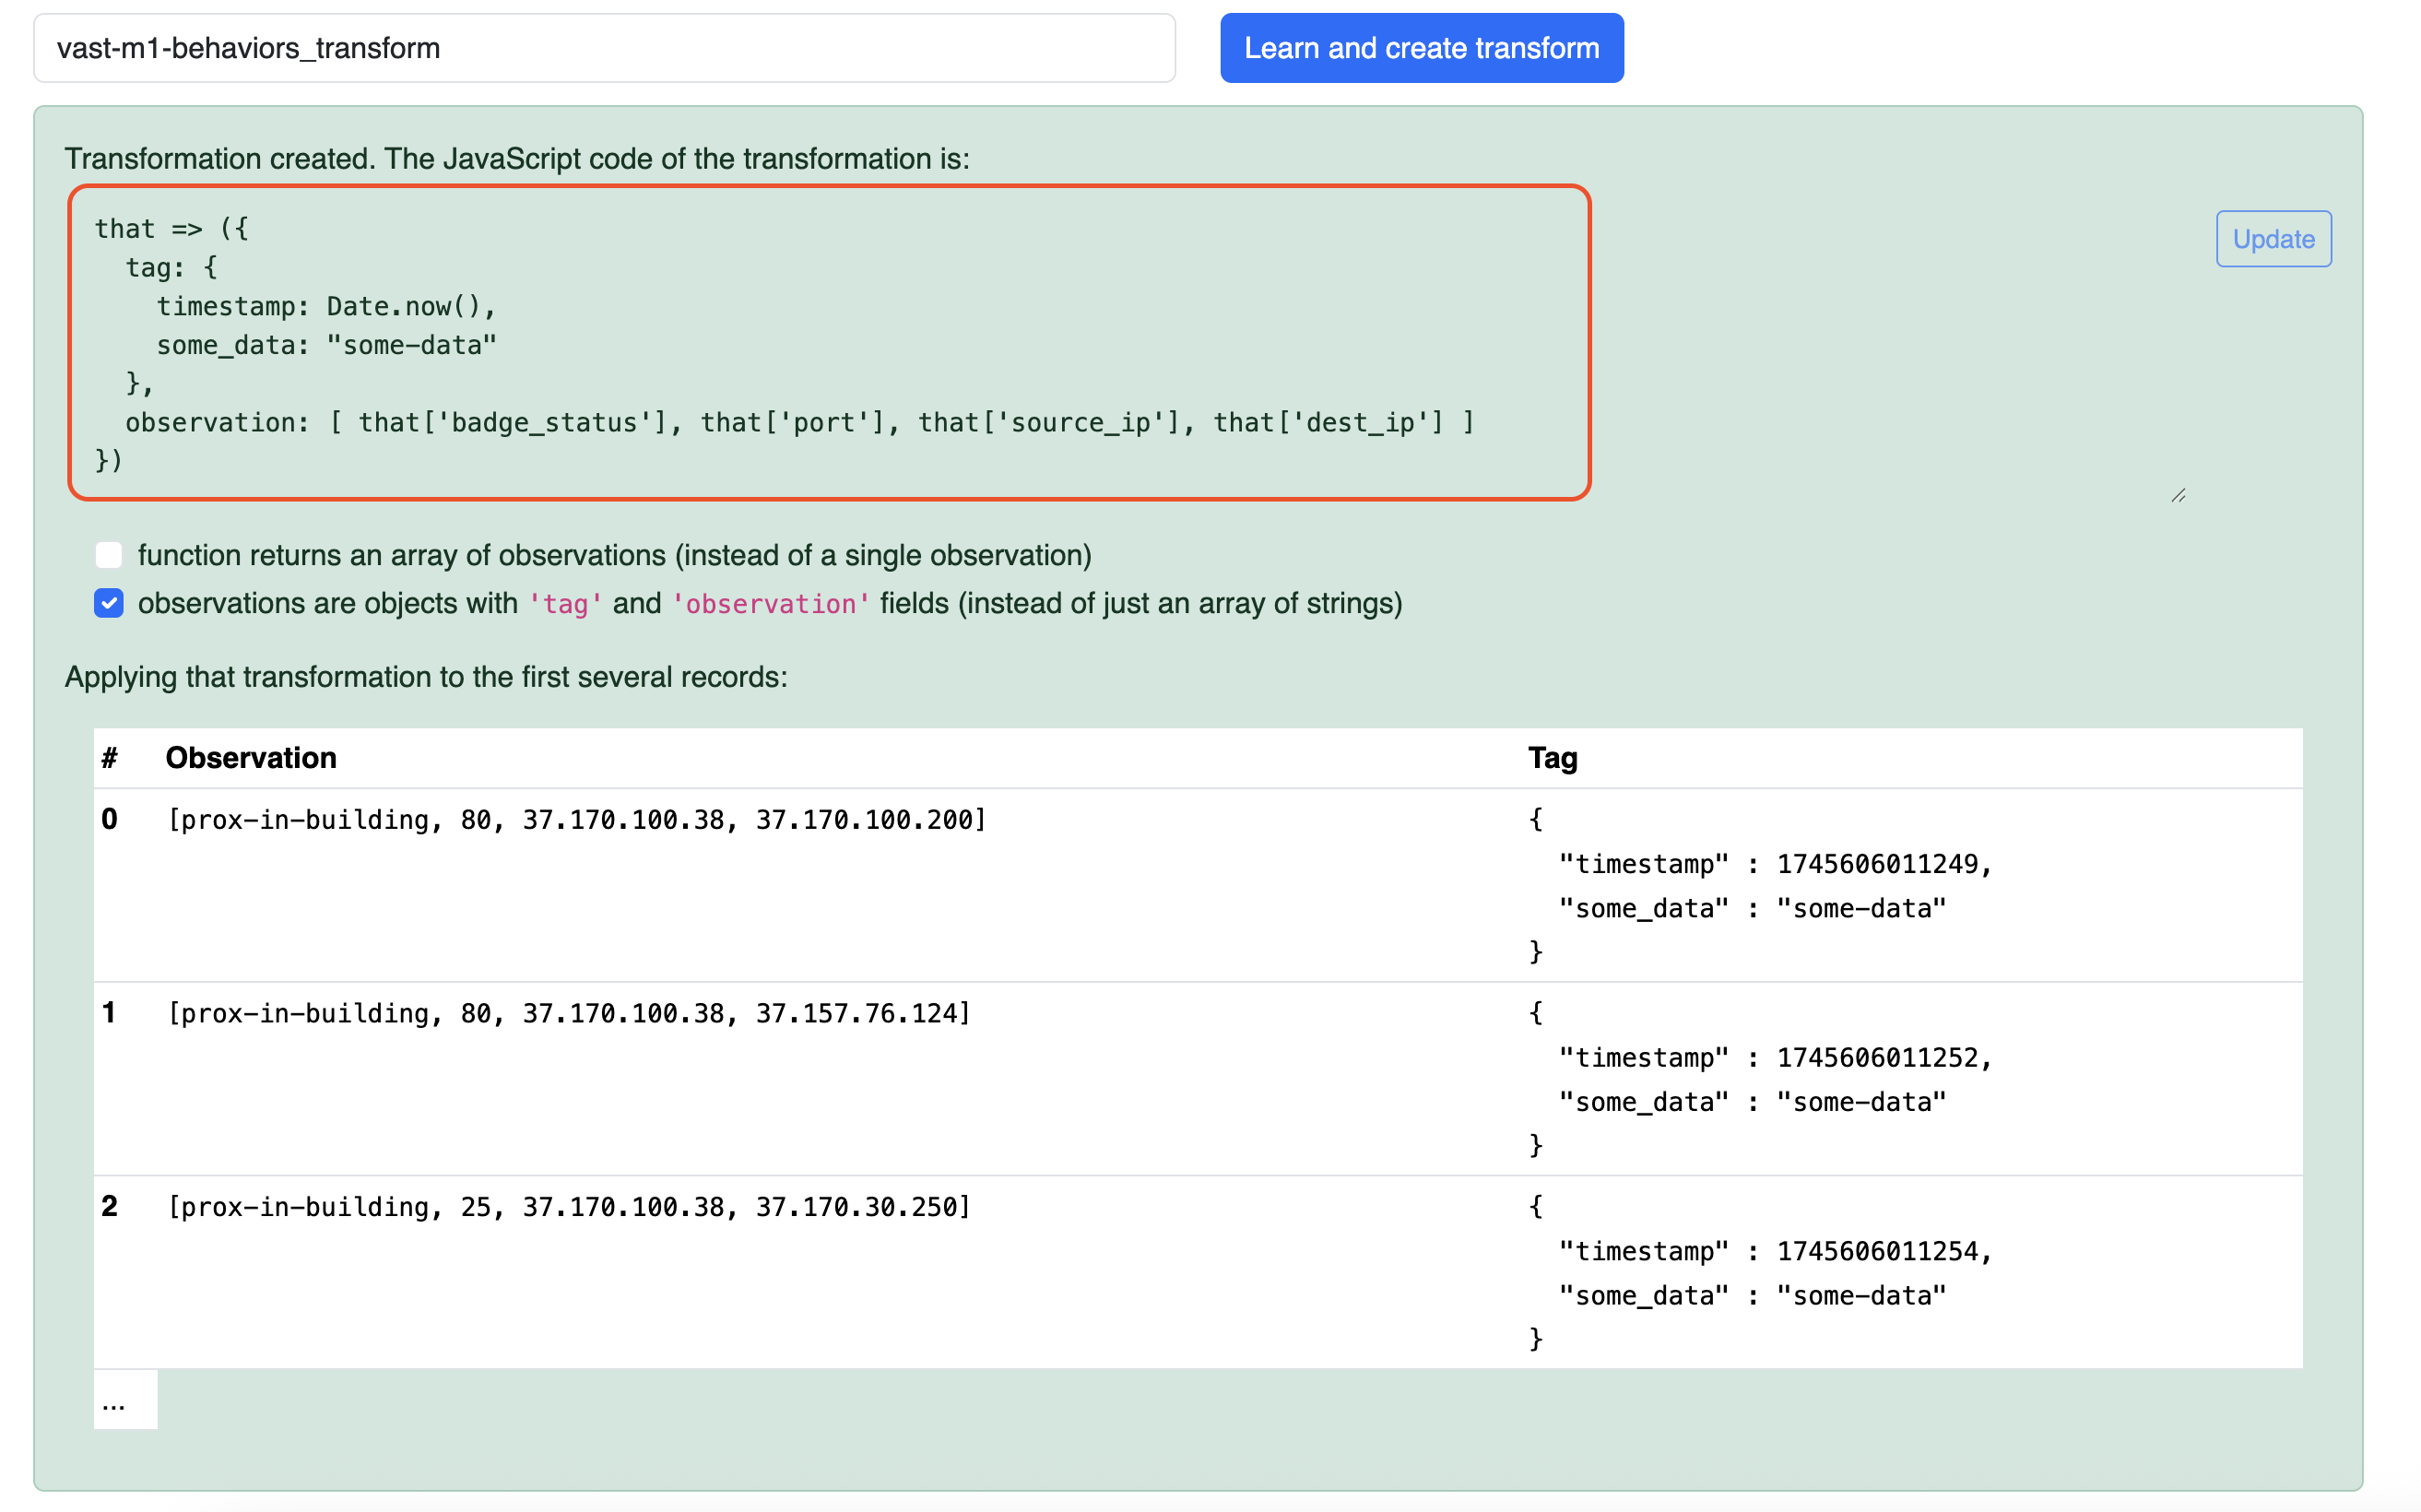
A tag carries metadata or other content through Novelty with an observation, so you can correlate each input record with its output score. To tag observations, write a transformation that returns an object with two properties instead of an array of strings. The observation property is the array of strings to score, and the tag property is any JSON value. Novelty does not use the tag to score the observation, and it includes the tag in the observation's result.
For example, this transformation tags each observation with a timestamp and a fixed string:
that => ({
  tag: {
    timestamp: Date.now(),
    some_data: "some-data"
  },
  observation: [ that['badge_status'], that['port'], that['source_ip'], that['dest_ip'] ]
})
To apply it in the Upload UI:
- Replace the code in the transformation box with this function.
- Check observations are objects with 'tag' and 'observation' fields.
- Click Update.
The table below the box then shows each observation with its tag.
Ingest Records

After creating a transformation, 3 controls are enabled:
- Model name input: A named group of observations (also referred to as a namespace). Each observation in the same model should have the same structure. Each model is entirely separate from the others. The + button next to the input creates the model.
- Rescore Observation Results toggle: Since data uploaded into Novelty though the Upload UI is a batch of data, Observations can be scored in batch mode.
- In streaming mode, each observation is scored based on the prior observations in the model.
- In batch mode, each observation is scored based on every observation in the batch.
- Ingest all records button: Starts the streaming ingest of records over a WebSocket.
To ingest the file:
- Enter a model name, such as
vastdata. - If the model does not exist yet, click + to create it. With a model that does not exist, Ingest all records fails with "Ingest failed" and the message "Could not create novelty stream".
- Click Ingest all records.
If the Rescore Observation Results toggle is disabled, Novelty provides only streaming scores of observations. If the toggle is enabled, then after the streaming scores are complete and no records remain in the batch, Novelty rescores each observation and provides batch observation results.
Viewing the Observations Results
After initiating an ingest, click Plots in the sidebar and choose your model under Display plots for novelty model to view the results.
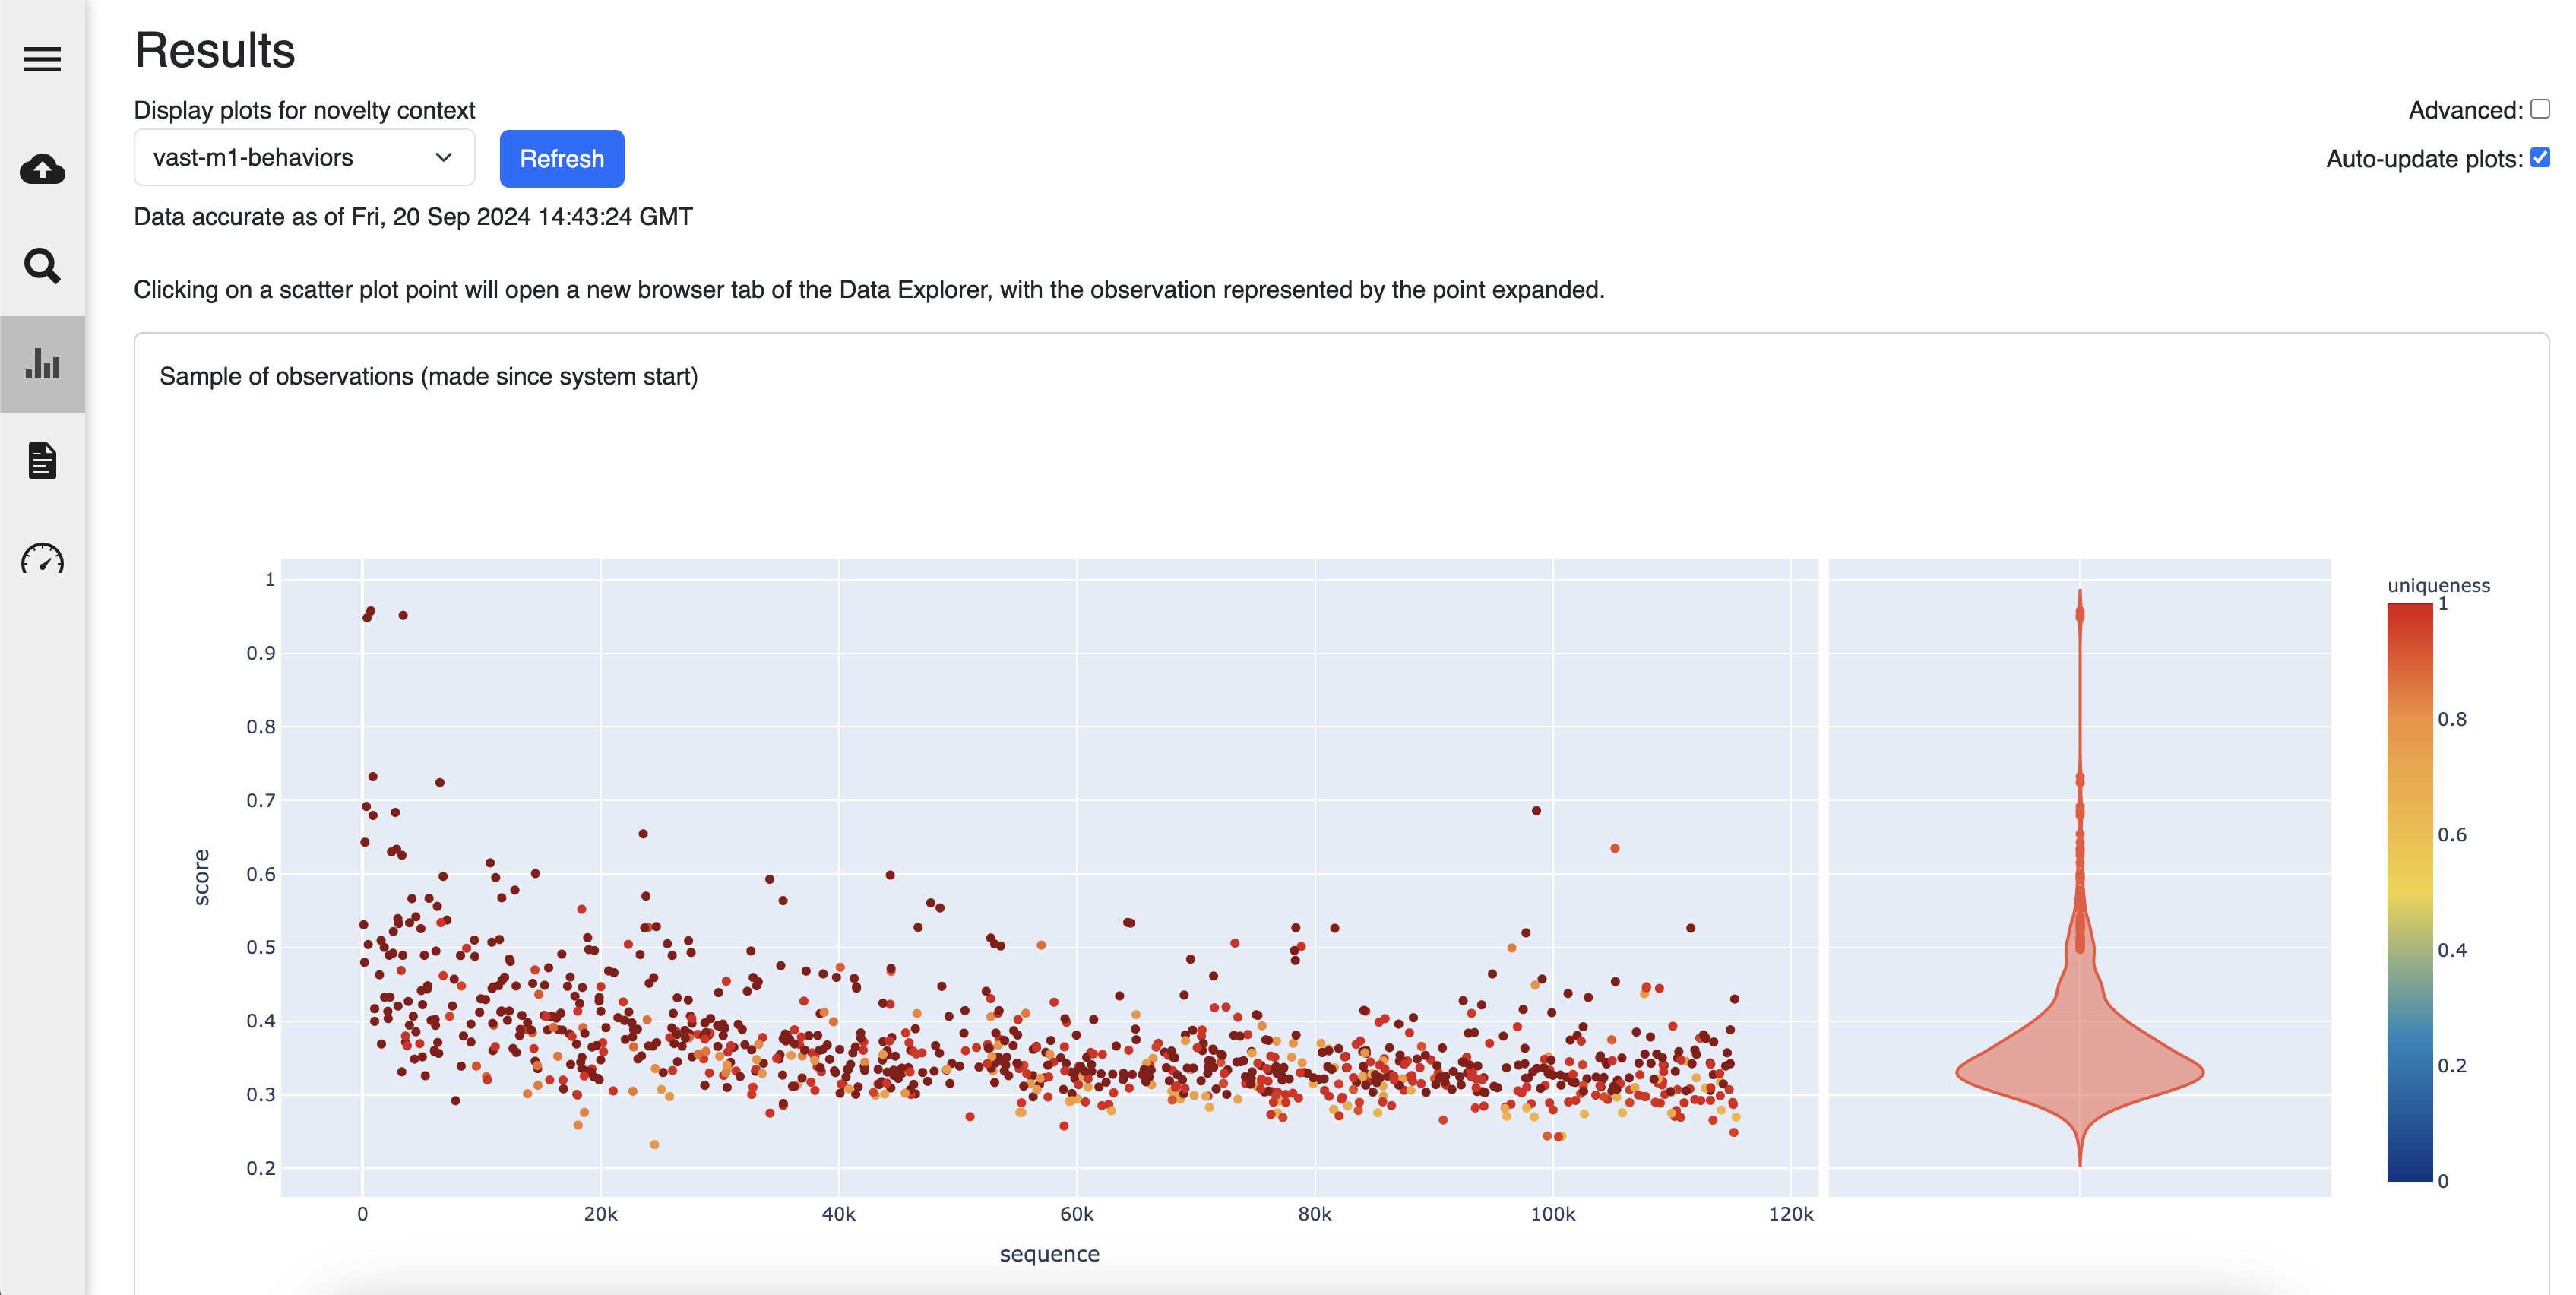
There are 4 plots on the Plots page. The first 3 plots demonstrate what happens when streaming observations into Novelty. They update automatically as data is streaming in. The 4th plot demonstrates what happens when ingesting a batch of data with the Rescore Observation Results toggle enabled. It will wait until all data has been ingested, and then reprocessed, so that all scores are based on all observations. Only if the data is rescored will the plot display the results.
- Sample of observations (made since system start)
- Recently made observations
- Observations with highest scores (made since system start)
- Batch Observation Results with highest scores (rescored streaming observation results)
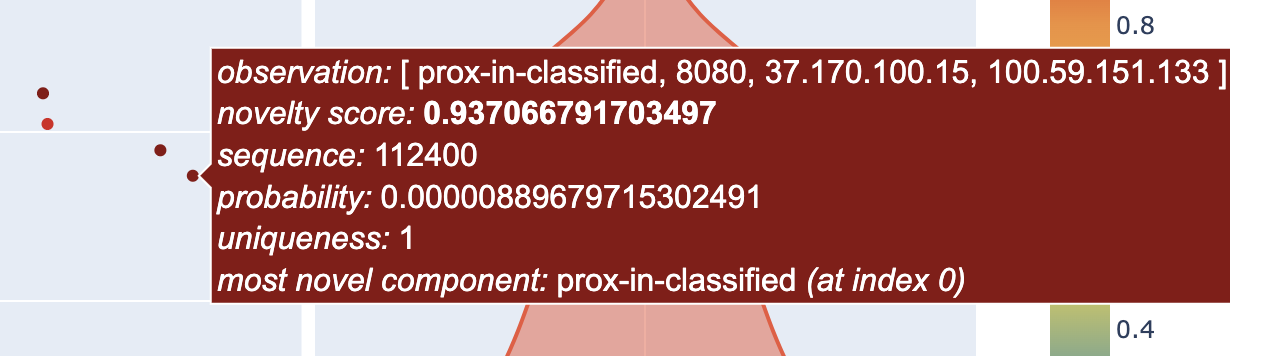
Each plot shows Observation Results. Hover over a point to see its observation, novelty score, sequence, probability, uniqueness, and most novel component.
Note
An interesting piece of data in the Observation Result is the Most Novel Component, which tells you which Observation Component was the most anomalous piece of categorical data in the Observation.
Stream Data using the REST API
Novelty's REST API provides a more flexible interface for scoring observations from different input streams.
To mirror the Upload UI, use the same dataset (VAST Insider Threat), from the same source (Local File), and the same transformation function, created below under the name vast. In a production situation, the Kafka and WebSocket sources would enable Novelty to consume from a potentially infinite stream.
By default, Novelty reads files only from the file_ingests/ directory inside the directory it was started from, and only files that were there when it started. Put vast-m1-behaviors.csv in file_ingests/ before you start Novelty, or restart Novelty after you add it. To read from another directory, list it in thatdot.novelty.file-ingest.allowed-directories in the config file. The list replaces the default, so include file_ingests in it too if you still use that directory. Novelty reads only files directly inside a listed directory, not files in its subdirectories.
Rapid REST API testing with provided .rest file
We've created a short .rest file that can be used with VSCode's REST Client plugin or IntelliJ's HTTP Client to rapidly try out the following REST API calls. Use it as a point-and-click alternative to cURL.
Create a Model
Before streaming data, you must create a model to store observations. See Core Concepts for the model naming rules.
Create Model: POST /api/v2/system/models
POST /api/v2/system/models
Content-Type: text/plain

vastdata
Create Transformation
A transformation needs to be created, which will convert each record being streamed in, to an Observation. You can use the Create Transformation Function endpoint to create a transformation. Transformations are scoped to a model — in this example, we use the vastdata model created above.
Create Transformation Function: POST /api/v2/model/{modelName}/transformations
{
  "name": "vast",
  "function": "that => [that['badge_status'], that['port'], that['source_ip'], that['dest_ip']]",
  "type": "JavaScript"
}
Note
If you are tagging your observations, set recordFormat to TAGGED when you create the transformation. Novelty then reads each result of the transformation as an object with tag and observation properties instead of an array, and the tag can be any JSON value. This request body is YAML, so send it with Content-Type: application/yaml:
name: vast-tagged
function: |
  that => ({
    tag: {
      timestamp: Date.now(),
      some_data: "some-data"
    },
    observation: [ that['badge_status'], that['port'], that['source_ip'], that['dest_ip'] ]
  })
type: JavaScript
recordFormat: TAGGED
To use it, set the ingest's transformation to vast-tagged in the next step.
Stream File into Novelty
After creating a transformation, it can be used as part of the request to stream data in from a local file. You can use the Create Novelty Stream endpoint to create a new stream. The model name is part of the URL path. In the following example, we are using the vast named transformation, created in the prior step, and streaming into the vastdata model.
Create Novelty Stream: POST /api/v2/model/{modelName}/ingests
{
  "name": "vast-ingest",
  "transformation": "vast",
  "source": {
    "type": "File",
    "path": "file_ingests/vast-m1-behaviors.csv",
    "format": {
      "type": "CSV",
      "headers": true
    }
  },
  "isTwoPassIngest": true
}
isTwoPassIngest matches the Upload UI's Rescore Observation Results toggle. After the whole file is read, Novelty rescores every observation, and the batch plot shows the rescored results.
This request sets no outputWorkflow, so Novelty uses the default, a single Drop destination. To send results somewhere, add an outputWorkflow with a list of destinations. Each destination has one of these types:
- Drop: discards the results.
- File: writes each result to a file as one line of JSON.
- HttpEndpoint: sends each result to a URL as an HTTP POST.
- Kafka: publishes the results to a Kafka topic.
- Kinesis: publishes the results to an Amazon Kinesis data stream.
- ReactiveStream: broadcasts the results to a Reactive Stream that other thatDot products can subscribe to (standalone deployments only).
- SNS: publishes the results to an AWS SNS topic.
- StandardOut: prints each result as one line of JSON to Novelty's standard output.
The fields for each type are in the Create Novelty Stream: POST /api/v2/model/{modelName}/ingests reference.
Even though the REST API was used to stream data in, the observation result plots in the UI will still populate with data. To view the results of your ingest via REST API, go to the /plots route to view the observation results (same as you did when uploading data via the UI).
Next Steps
Now that you've gotten a feel for scoring categorical data using Novelty, check out these other resources to continue exploring anomaly detection using Novelty.
- Novelty VAST Insider Threat Blog Demo
- Using Quine Enterprise with Novelty for anomaly detection using data from multiple sources